Introduction
File permissions must be configured and maintained on multi-user systems like Linux in order to guarantee that only authorized users can access the files they are supposed to.
Use the chmod command to modify a file’s permissions if necessary. Additionally, it enables recursive file permission changes so that numerous files and subdirectories can be configured with a single command.
This tutorial will teach you how to modify file permissions on Linux and use chmod recursively.
Prerequisites
- A command line / terminal window (Ctrl+Alt+T or Ctrl+Alt+F2)
- A user account with sudo privileges (optional)
- A Linux system
Check File Permission
If you need to check the file permissions in the working directory, use the command:
ls –lThe output lists the permissions of all the files in the directory.
For instance, the Example directory contains three files (test1.txt, test2.txt, and test3.txt) with the same permissions (-rw-rw-r–).

The file permissions listed above tells us the following:
- The owner has read and write privileges
- The owner’s group has read and write privileges
- Other users have read privileges
Change Permission Recursively
It is common to use the basic chmod command to change the permission of a single file. However, you may need to modify the permission recursively for all files within a directory.
In such cases, the chmod recursive option (-R or --recursive) sets the permission for a directory (and the files it contains).
The syntax for changing the file permission recursively is:
chmod -R [permission] [directory]Therefore, to set the 755 permission for all files in the Example directory, you would type:
sudo chmod -R 755 ExampleThe command gives read, write, and execute privileges to the owner (7) and read and execute access to everyone else (55).

Change Permission With the find Command
To assign separate permissions to directories and files, you can use the find command.
The basic syntax includes using the find command to locate files/directories and then passing it on to chmod to set the permission:
sudo find [directory] -type [d/f] -exec chmod [privilege] {} \;- Replace
[directory]with the directory path that holds the files and subdirectories you want to configure. - Specify whether it is searching for a directory
-type dor a file-type f. - Set the file
[privilege]with thechmodcommand using the numerical or symbolic mode.
Avoid assigning execute privileges to files. A common setup would include running the following commands:
sudo find Example -type d -exec chmod 755 {} \;sudo find Example -type f -exec chmod 644 {} \;In this example, the directories have 755 (u=rwx,go=rx) privileges, while the files have 644 (u=rw,go=r) privileges.

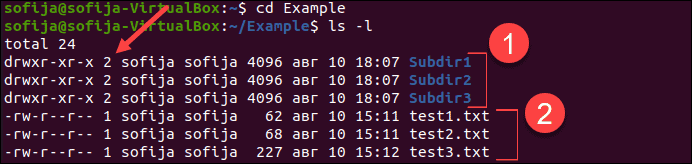
You can check to verify directories and files have different permission settings by moving into the Example directory (cd Example) and listing the content (ls -l). The output should be similar to the one below:
Change Permission of Specific Files Recursively
Combining the find command with chmod can also be used for changing the permission of files that are a specific type.
The command syntax for changing the permission of a specific file type in a directory is:
find [directory] -name "*.[filename_extension]" -exec chmod [privilege] {} \;For example, to make all .sh files in the current directory executable, you would use:
find . -name "*.sh" -exec chmod +x {} \;Conclusion
You should now be able to use the find command or chmod -R to recursively update the file permission on your Linux system.As an alternative. The umask command is another tool you can use to modify the default permissions.