Overview
There are frequently areas of the website that you want to keep access to restricted when setting up a web server. Although web applications frequently come with their own permission and authentication systems, if these are insufficient or not accessible, access can be restricted via the web server itself.
We’ll show you how to password-protect assets on an Ubuntu 14.04 Apache web server in this tutorial.
Required conditions
You will want access to an Ubuntu 14.04 server environment in order to begin. To carry out administrative activities, you will require a non-root user with sudo rights. See our first server setup tutorial for Ubuntu 14.04 to find out how to create such a user.
Install the package called Apache Utilities.
Using the htpasswd software, we can generate the file containing the credentials required to access our restricted material. The Ubuntu repositories provide the apache2-utils package, which contains this.
Enter this command to update the local package cache and install the package. If the Apache2 server is not yet installed on the server, we will use this chance to obtain it as well:
sudo apt-get update
sudo apt-get install apache2 apache2-utils
Make the password file.
Now that the htpasswd command is available to us. Using this, we can generate a password file that Apache can utilize for user authentication. For this, we’ll create a hidden file in our /etc/apache2 configuration directory called.htpasswd.
To create the desired file the first time we use this software, we must add the -c argument. To add a new entry to the file, we finish the command with a username (in this case, Sammy):
sudo htpasswd -c /etc/apache2/.htpasswd sammyYou will be asked to supply and confirm a password for the user.
Leave out the -c argument for any additional users you wish to add:
sudo htpasswd /etc/apache2/.htpasswd another_userIf we view the contents of the file, we can see the username and the encrypted password for each record:
cat /etc/apache2/.htpasswdOutput
sammy:$apr1$lzxsIfXG$tmCvCfb49vpPFwKGVsuYz.
another_user:$apr1$p1E9MeAf$kiAhneUwr.MhAE2kKGYHK.Set up Password Authentication for Apache
We need to set Apache up to verify this file before serving our protected content now that we have our users and passwords in a format it can read. There are two ways we can go about this.
The first method is to add our password protection to the virtual host file and modify the Apache configuration. Because it saves the price of accessing remote configuration files, performance will typically be improved. It is advised to use this approach if it is available.
You can use an.htaccess file to restrict access if you don’t have the capacity to change the virtual host file or if you already use them for other purposes. Apache makes use of.htaccess files to enable the setting of certain configuration parameters inside a file in a content directory. The drawback is that Apache may have performance issues as a result of having to reread these files for each request involving the directory.
Select the below option that best meets your needs.
Setting Up Access Control in the Definition of the Virtual Host
To start, open the virtual host file to which you want to apply a restriction. We’ll use the 000-default.conf file, which contains the default virtual host set up by Ubuntu’s apache package, for our example:
sudo nano /etc/apache2/sites-enabled/000-default.confInside, with the comments stripped, the file should look similar to this:
/etc/apache2/sites-enabled/000-default.conf
<VirtualHost *:80>
    ServerAdmin webmaster@localhost
    DocumentRoot /var/www/html
    ErrorLog ${APACHE_LOG_DIR}/error.log
    CustomLog ${APACHE_LOG_DIR}/access.log combined
</VirtualHost>
Every directory is subject to separate authentication. You must use a <Directory ___> block to target the directory you want to limit in order to set up authentication. We’ll limit the document root in our example, but you can change this listing to only target a particular directory on the web space:
/etc/apache2/sites-enabled/000-default.conf
<VirtualHost *:80>
    ServerAdmin webmaster@localhost
    DocumentRoot /var/www/html
    ErrorLog ${APACHE_LOG_DIR}/error.log
    CustomLog ${APACHE_LOG_DIR}/access.log combined

    <Directory "/var/www/html">
    </Directory>
</VirtualHost>
Indicate in this directory block that we want to configure authentication on the Basic level. Select a realm name for the AuthName so that it appears to the user when they are prompted for their credentials. To direct Apache to the password file we generated, use the AuthUserFile directive. Lastly, in order to use this resource, a legitimate user must be present, which implies that anyone who can use a password to prove their identity will be permitted access:
/etc/apache2/sites-enabled/000-default.conf
<VirtualHost *:80>
    ServerAdmin webmaster@localhost
    DocumentRoot /var/www/html
    ErrorLog ${APACHE_LOG_DIR}/error.log
    CustomLog ${APACHE_LOG_DIR}/access.log combined

    <Directory "/var/www/html">
        AuthType Basic
        AuthName "Restricted Content"
        AuthUserFile /etc/apache2/.htpasswd
        Require valid-user
    </Directory>
</VirtualHost>
Save and close the file when you are finished. Restart Apache to implement your password policy:
sudo service apache2 restartThe directory you specified should now be password protected.
Configuring Access Control with .htaccess Files
If you wish to set up password protection using .htaccess files instead, you should begin by editing the main Apache configuration file to allow .htaccess files:
sudo nano /etc/apache2/apache2.confFind the <Directory> block for the /var/www directory that holds the document root. Turn on .htaccess processing by changing the AllowOverride directive within that block from “None” to “All”:
/etc/apache2/apache2.conf
. . .

<Directory /var/www/>
    Options Indexes FollowSymLinks
    AllowOverride All
    Require all granted
</Directory>

. . .
Save and close the file when you are finished.
Next, we need to add an .htaccess file to the directory we wish to restrict. In our demonstration, we’ll restrict the entire document root (the entire website) which is based at /var/www/html, but you can place this file in any directory you wish to restrict access to:
sudo nano /var/www/html/.htaccessWithin this file, specify that we wish to set up Basic authentication. For the AuthName, choose a realm name that will be displayed to the user when prompting for credentials. Use the AuthUserFile directive to point Apache to the password file we created. Finally, we will require a valid-user to access this resource, which means anyone who can verify their identity with a password will be allowed in:
/var/www/html/.htaccess
AuthType Basic
AuthName "Restricted Content"
AuthUserFile /etc/apache2/.htpasswd
Require valid-user
Save and close the file. Restart the web server to password protect all content in or below the directory with the .htaccess file:
Confirm the Password Authentication
To confirm that your content is protected, try to access your restricted content in a web browser. You should be presented with a username and password prompt that looks like this:
Confirm the Password Authentication
To confirm that your content is protected, try to access your restricted content in a web browser. You should be presented with a username and password prompt that looks like this:
Confirm the Password Authentication
To confirm that your content is protected, try to access your restricted content in a web browser. You should be presented with a username and password prompt that looks like this:
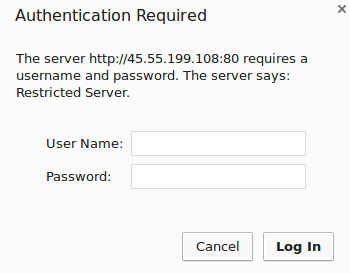
If you enter the correct credentials, you will be allowed to access the content. If you enter the wrong credentials or hit “Cancel”, you will see the “Unauthorized” error page:

In summary
Everything you need to configure basic authentication on your website should now be available. Remember that in order to prevent your credentials from being communicated to the server in clear text, password protection and SSL encryption should be used in tandem. Use this tutorial to find out how to generate a self-signed SSL certificate that you can use with Apache. Use this tutorial to find out how to install a business certificate.